Friday, March 27, 2015

Skin on Frame Kayak: Fitting the Deckbeams


One of the challenges of building things that are all curves and no squares is figuring out how to bring all of the parts together without an advanced degree in mathematics.  The front three deckbeams of this kayak are curved and they are tenoned into the gunwales which are sprung out to shape at a 25 degree angle.


A couple of minutes with a scrap of wood, a bevel gauge, and a pencil gave me the offset that I needed to be able to scribe the shoulders of my tenon with the deckbeams clamped in place.


A spacer creates the offset and extends the angle of the gunnel across the deckbeam.


Repeat the process on the other side, connect the lines from one side to the other, and lay out a 3/8" tenon to end up with something like this.


Saw away the waste...


And a little paring leaves a tenon that is ready to slide into it's mortise after rounding the corners.


Tuesday, March 24, 2015

This Luddite's on Instagram...

It's fair to say that nothing I do is insta.  When I wanted a kayak to do some exploring on the coast near where I live, I spent two months of the paddling season building a skin-on-frame kayak.  This winter when I got into cross country skiing, I spent most of the ski season making myself a new pair of skis.  When I get in the kitchen to cook dinner, I usually start by caramelizing onions to a deep, rich brown.


After a year of goading and encouragement by friends, (mostly from Caleb James) I recently joined Instagram.  If you look to the right on this blog, you will now see a link to my Instagram feed.  I've been posting for a couple of weeks and so far it's been fun.  It gives me the opportunity to share the small things that I wouldn't write a blog post about and I'm starting to see some interesting woodworking that I would have no other way to see.

If you want to follow what I am posting there my username is tim.manney.  You can use the Instagram app or just click the photo link to the right which will take you to my feed.  Expect a lot of spoon carving, toolmaking, chairs, and skin on frame kayaks.  I'll try to keep the thigh gap selfies to a minimum.  Promise.

I'll also be posting pictures of tools for sale when I have them in stock, or when I use materials that are not my standard options,  like these curly maple reamers I've been finishing up.


This batch is all spoken for, but I'll I have about 12 more in a couple of weeks.  They will be $135 each.  Email me or comment if you are interested.

Thursday, March 5, 2015

Steam Bent Spoon Blanks


Perfect crooks for spoon carving are rare in the wild, so I've taken to shaving blanks that follow the wood fibers and then steam bending them into the perfect crooks that my heart so desires to carve into spoons.  I lose some of the romance of searching for, finding, and working with a curve that was grown by a tree, but I gain a limitless supply of perfect crooked spoon blanks that are a true joy to carve.  

Because these blanks have no twisting, curling, or knotty fibers, they finish carve beautifully.  This makes it easier to leave the nice, long, consistent knife marks that are one of the calling cards of skillful spoon carving.


The process begins with a straight section of spoon carving wood and a froe.  I'm carving mostly red maple and paper birch these days.


I sight down the blank to orient the split in a way that avoids small knots.
Then tap the froe in...
and pull back...
to yield two halves.
I like to take a moment to look over the blanks and get myself oriented.

Then onto the shaving horse...

 ...to create a flat face that perfectly follows the wood fibers.
You know you've got it right when the wood cuts cleanly in both directions and the grain runs in straight lines from one end to the other.
Not quite there.  Notice the tearing on the right hand side and the V shaped grain lines starting a couple of inches in front of the shaving horse jaw.  It is a little hard to see on the red maple, but look closely.

Grain lines that run from one end of the blank to the other tell you that the blank follows the wood fibers.
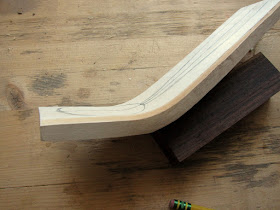
I trim the edges square to the face.  I like to keep the blank a little wider than the spoon I will be carving.

I scribe the blank to 5/8" thickness.

...and shave to the scribed line.

I like the grain pattern inside the bowl when the bark side of the blank is the top side of the spoon.  The top of the spoon will be against the bending form.

I mark the outside of the bend so that I don't get turned around when the blank is hot from the steam box.

Basic bending form shape with blank in position.


Half an hour of steam and a couple of clamps create the bend.

Twelve hours later the blank has set enough to remove from the form and start carving.

Some of the fibers tore on the outside of this blank.

I shave down below the torn fibers...

...and then follow the newly exposed layer of fibers from one end of the blank to the other.

That nice flat surface is ideal for layout.

The back of the bowl should begin a little bit up the curve, for looks.

If you carve them fast these bent blanks are soft, like green wood. which they are!  But you'll want to carve them fast because at close to 1/2" thickness they dry out quickly and become more difficult to work with.  I have a handful of spoons and spatulas that I have bent like this that are in constant use.  Over the past year and a half the bends have opened very little.

Give it a try!  Spoons carved from these blanks can be very thin because they perfectly follow the grain and the sinuous curves make for beautiful, sweeping shapes.

Here is a link to pictures of an eating spoon that I carved like this last year.