Wednesday, July 30, 2014

A few spoons and a dissection...


I was trying to close the upper portion of a window a couple of days ago and couldn't quite reach it.  I grabbed my workshop spoon, paused for a moment, and then pushed up on the window with the back of the handle.  I gave it a good shove and half of the bowl split off.


I was never satisfied with that spoon, which is why it never made it out of the workshop.  But I immediately saw new value in it.   I planed the handle down to the center line and now I have a perfect longitudinal section straight down the middle of the spoon which illustrates a couple of basic points of spoon design.

Notice the shape of the bowl.  The depth is in the back.

If you look closely at the pictures above you can see that the depth of the spoon's bowl is toward the back.  The front portion of the bowl is like a ramp leading down into that depth.  Notice how flat the front of the bowl is.  This shape, with the depth in the back and the front relatively flat, holds a good scoop of food while still allowing your upper lip to slide all the way along the bottom of the bowl and sweep that food into your mouth.  When the shape is right, eating from a spoon is a satisfying experience.  When the shape isn't right, the edges of the spoon dig into your lips and there is a morsel of food that has escaped your lip left in the bottom of the bowl after each bite.

Outside of the dissected spoon.

The other important detail to notice from this spoon dissection is how the thickest portion of the spoon relates to the depth of the bowl.  From the side I like a spoon to be an arrangement of sweeping curves.  This spoon was carved from a piece of straight lilac, so the curves are gentle and when you are not looking at them the spoon has the appearance of being flat.  My experience is that when a spoon is truly flat, it looks dead.  A few gentle curves along the length as the handle swells to the depth of the bowl gives the spoon a more lively look.  The neck of the spoon is the same thickness as the deepest part of the bowl, from the neck the thickness sweeps away into the thin part of the handle where the spoon is held.

Apple eating spoon of similar design.

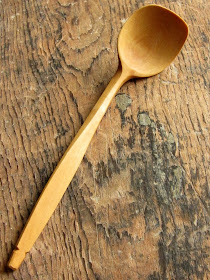
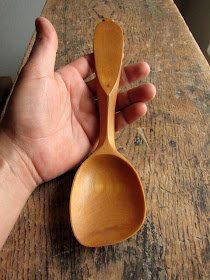
Since I never really cared for that spoon I didn't want to post pictures of it all alone for the spoon nuts of the world to see, so I went through our spoon mug and pulled out a couple of old favorites.  As you look at the pictures think about how the different parts of the spoon (the bowl, the neck, the handle, and the finial) relate to each other.  Or maybe you feel that they don't relate to each other.  Looking at the shapes of the spoons like that helps to build your idea of a pleasing spoon.

These are a few that I enjoy.


Sweet birch serving spoon.


Rhododendron eating spoon. 


Steambent paper birch eating spoon.


Friday, July 4, 2014

Simple Band Saw Fence


My band saw is the machine workhorse of my workshop and I find a band saw fence useful for ripping parts close to dimension, but also for precisely ripping tenon cheeks and cutting other joinery.  I built this wooden fence for my band saw almost immediately after I bought it.  The slot in the table for removing and replacing the blades is on the front of my saw which makes it incompatible with most aftermarket band saw fences.  After using this set up for the past four years, I wouldn't want anything else.  It is accurate, easy to adjust, and the price is right.

Wooden band saw fence.

If you are looking at these pictures and thinking, "How do you adjust this fence for blade drift?" then your life is about to get simpler.  Blade drift is caused by the crown of the bandsaw tire.  When the blade is centered on the crown of the tire your band saw won't drift (assuming your saw is well tuned and you have a blade that has a good weld and large teeth and gullets for removing saw dust efficiently).  If the blade is forward or behind the crown of the tire, then the blade will drift at a consistent angle.  To correct, adjust the tracking of the blade to the center of the wheel.  

My fence is square to the front edge of my band saw table.  I adjust the blade tracking to the center of the wheel each time I install a new blade.  I have never had a problem with blade drift.  Michael Fortune wrote a great article a few years ago for Fine Woodworking that covered this and some other band saw set up and tuning information.  I think it is the most comprehensive source for basic band saw set up and blade selection.  Here is the link.


The fence is made from a scrap of 8/4 red oak that is 3 1/2" wide.  The rail that references against the front edge of the table is a piece of  3/4" plywood that is 3 1/2" wide.  The fence and the rail are joined square to each other with a liberal quantity of screws to keep the fence from racking in use.

Notice the leather shim between the fence and the rail.

One detail not to miss is the shim between the fence and the rail.  I used leather because I had a scrap laying around, but a piece of a cereal box or some other similar flat cardboard would work as well.  The bottom of the fence lays flat on the table and the shim keeps the rail down below the surface of the table so that it does not interfere with the wood being sawn.

Clamped in place.

The face of the fence is planed square to the bottom.  A 24" Irwin quick grip clamp holds the fence in place on the saw.  The fence needs to be a little bit shorter than the length of the table so that the jaw of the clamp on the far side of the table is pressing on the table and pulling the rail tight against the front edge.

Fence does not extend past the band saw table.
With very light clamp pressure you can slide the fence back and forth to set the distance from the blade.  I use a steel ruler butted against the fence and take a reading from a tooth that is set toward the fence.

Setting the fence.
Apply full clamping pressure and you are ready to saw accurately.